
Sew-a-long for McCalls 5800 Pattern
I've been meaning to do some sew-a-longs for a while and had a friend contact me about making her first dress... so I'm making this to help her as she makes her first dress. Hopefully it can help others, too.
Here are somethings I've learned over the years:
- When you get too tired/frustrated/etc and start making lots of mistakes, just stop. Go get something to eat, sleep, but don't work on sewing anymore.
- When you make a mistake, just get the seam ripper out and correct the mistake at the source. Don't try to cover it up or do a ton of other steps to try to remedy the mistake.
Selecting your fabric
If you're a beginner, I'd strongly suggest using a cotton/cotton blend fabric. Stay away from silk or silky fabrics. They will slide all over the place while you're working and this isn't what you want to deal with while you're learning the basics.
And if you're a beginner, chances are that you will be shopping for your fabric from Joann's. Make sure to sign up for their mailing list so you'll have a coupon. Their fabric is pretty over-priced without a coupon. I've made many dresses using cotton from their quilting section -- http://www.joann.com/fabric/quilting-fabric-kits/.
And if you're a beginner, chances are that you will be shopping for your fabric from Joann's. Make sure to sign up for their mailing list so you'll have a coupon. Their fabric is pretty over-priced without a coupon. I've made many dresses using cotton from their quilting section -- http://www.joann.com/fabric/quilting-fabric-kits/.
Some tools you'll need.
- Seam ripper. Yes, you'll most likely need it. I still use mine and I've been sewing for years. No worries :-)
- Thread. I like Gutermann thread. http://www.joann.com/gutermann-sew-all-thread-500-m-/prd13384/#
- Zipper. I tend to use the old-fashion kind of zippers since they zip better than the invisible zippers and last longer, but an invisible zipper will work if that's what you prefer. Invisible zippers are probably a little bit easier to install, but again, they don't last as long and they can be a challenge to zip. http://www.joann.com/coats-clark-all-purpose-plastic-zipper-22-/prd34314/
- Needles. I prefer Schmetz needles and they fit in any sewing machine. http://www.joann.com/schmetz-universal-combo-pack/zprd_08562266a/
- Pins. I prefer glass-head pins since they don't melt if you go over them with your iron. http://www.joann.com/dritz-quilting-extra-fine-glass-head-pins-1-3-8-250-pk/xprd274427/
Let's begin.


***This is a good time to pin the straps together so you can try on the bodice to see how it is fitting you. I generally sew in just a bra (and bottoms!) the first time I'm working on a new pattern since I'm constantly trying it on to test the fit.


While the understitching step might sound unnecessary, don't skip it! Understitching will prevent the lining from making an appearance when you're wearing the dress.
Since I don't cut between sections while I'm understitching, this is what my dress looks like when I'm done.


I like to iron my straps like this... it seems to be the easiest way to get everything lined up.

- Pre-wash your fabric. This is necessary to allow your fabric to shrink before you begin working with it. Just wash and dry it like you are planning on cleaning your dress.
- Iron your fabric by placing the selvage edges together, and going from that edge until you get to the center of the fabric. Your fabric should come together to lay neatly along the fold line.


- Iron your pattern pieces so they lay flat.

- Arrange your pieces on your fabric.
- Cut out your pieces.

- Sew the bodice front together with the bodice side front. This seam is called a princess seam and is known for being flattering. Repeat for the lining.

Match the pieces together at the top and as you're sewing, you'll work the pieces together around the curve.
- Sew the bodice back together with the bodice side back. Repeat for the lining.
9. Sew the side seams together as shown. Repeat for the lining. Then press open.
***This is a good time to pin the straps together so you can try on the bodice to see how it is fitting you. I generally sew in just a bra (and bottoms!) the first time I'm working on a new pattern since I'm constantly trying it on to test the fit.
10. With right sides together, match the necklines for the bodice to the lining. I like to match the side seams first and then work my way around to fill in with pins.
11. Sew the necklines together in these five sections (left back, left arm hole, front, right arm hole, right back). Make sure not to sew all the way to the end of the strap. Scroll down for pictures that clarify that statement...


12. Clip around all of the curves.


As you can see, the last 2 to 3 inches of length on the straps are not sewn together. I'll explain why in the next step.
12. Clip around all of the curves.
13. Under-stitch the neckline for the bodice. In order to do this, I put the bodice under my sewing machine like so:
Bodice on my right, lining on my left.
Then fold over the neckline seam as shown.
The understitching will be very close to the seam for the neckine - say 1/8" - as shown below. You'll do this as far as you can (you will not be able to go the entire way since the strap will get in the way).
When you get to some clipped curves, just let the clips stay open as shown.
While the understitching step might sound unnecessary, don't skip it! Understitching will prevent the lining from making an appearance when you're wearing the dress.
Since I don't cut between sections while I'm understitching, this is what my dress looks like when I'm done.
So obviously I cut the threads and then iron:
14. Sew the straps together. This can be a little awkward, just be patient and it will come together, I promise. Match the bodice straps together so right sides are touching. Make sure that the lining straps are out of the way so you don't accidentally sew over them.
Repeat for the lining straps.
Before ironing, your straps will look like this.
I like to iron my straps like this... it seems to be the easiest way to get everything lined up.
Besides a few minutes of hand-sewing (to close the gaps on your strap ends), the bodice is now complete :-)
Yellow Smocked Romper.
I made this adorable (if I do say-so-myself!) romper yesterday. It was fabric that I had left over from a sundress that I made for the Kentucky Derby. The fabric was from Farmhouse Fabrics.
I love the fabric! Cotton with a satin finish - best thing since sliced bread.
 |
| 6 month size |
 |
| I wasn't sure if I should smock the pleats or not.. |
 |
... but a sewing buddy gave me the idea to smock a running trellis so I'll do that and then share the results :-) |
 |
Love the fabric!
|
Sew-a-long Smocked Bishop Dress
It was my pleasure to make a smocked bishop dress for
a childhood friend to give to a friend of hers with a little baby girl.
a childhood friend to give to a friend of hers with a little baby girl.
I buy most of my fabric from Farmhouse Fabrics. I don't have a local fabric store close to me and the quality/customer service at Farmhouse is wonderful! For this project, I bought their new spring colors of batiste -100% Cotton Lightweight Batiste, Gorgeous Spring Colors, 60" (2-7-13)
After the fabric was washed, I cut my pieces out:

Cutting out bias strips for the neck and armholes.

Here are the pieces lined up. The order from left to right is right back, right sleeve, front, left sleeve, left back.


Then I join the pieces using tiny french seams.
When I say tiny - I mean approximately an 1/8" of an inch finished.
To make a french seam, first place the pieces wrong sides together.

Then sew the pieces.

Trim very closely to the stitches. This part is really important when you're making french seams this tiny.


Flip the pieces so they are now right sides together and press with an iron.

Now sew extremely close to the raw edge - you just want to enclose the raw edge and that's it - no extra space.

And there you go - a very tiny french seam.

Repeat until you have all of them joined... like so....

Now you're ready for the pleating step. I like to use a wooden dowel to help feed the fabric through the pleater. Otherwise, it is very hard to keep everything neat and in line.


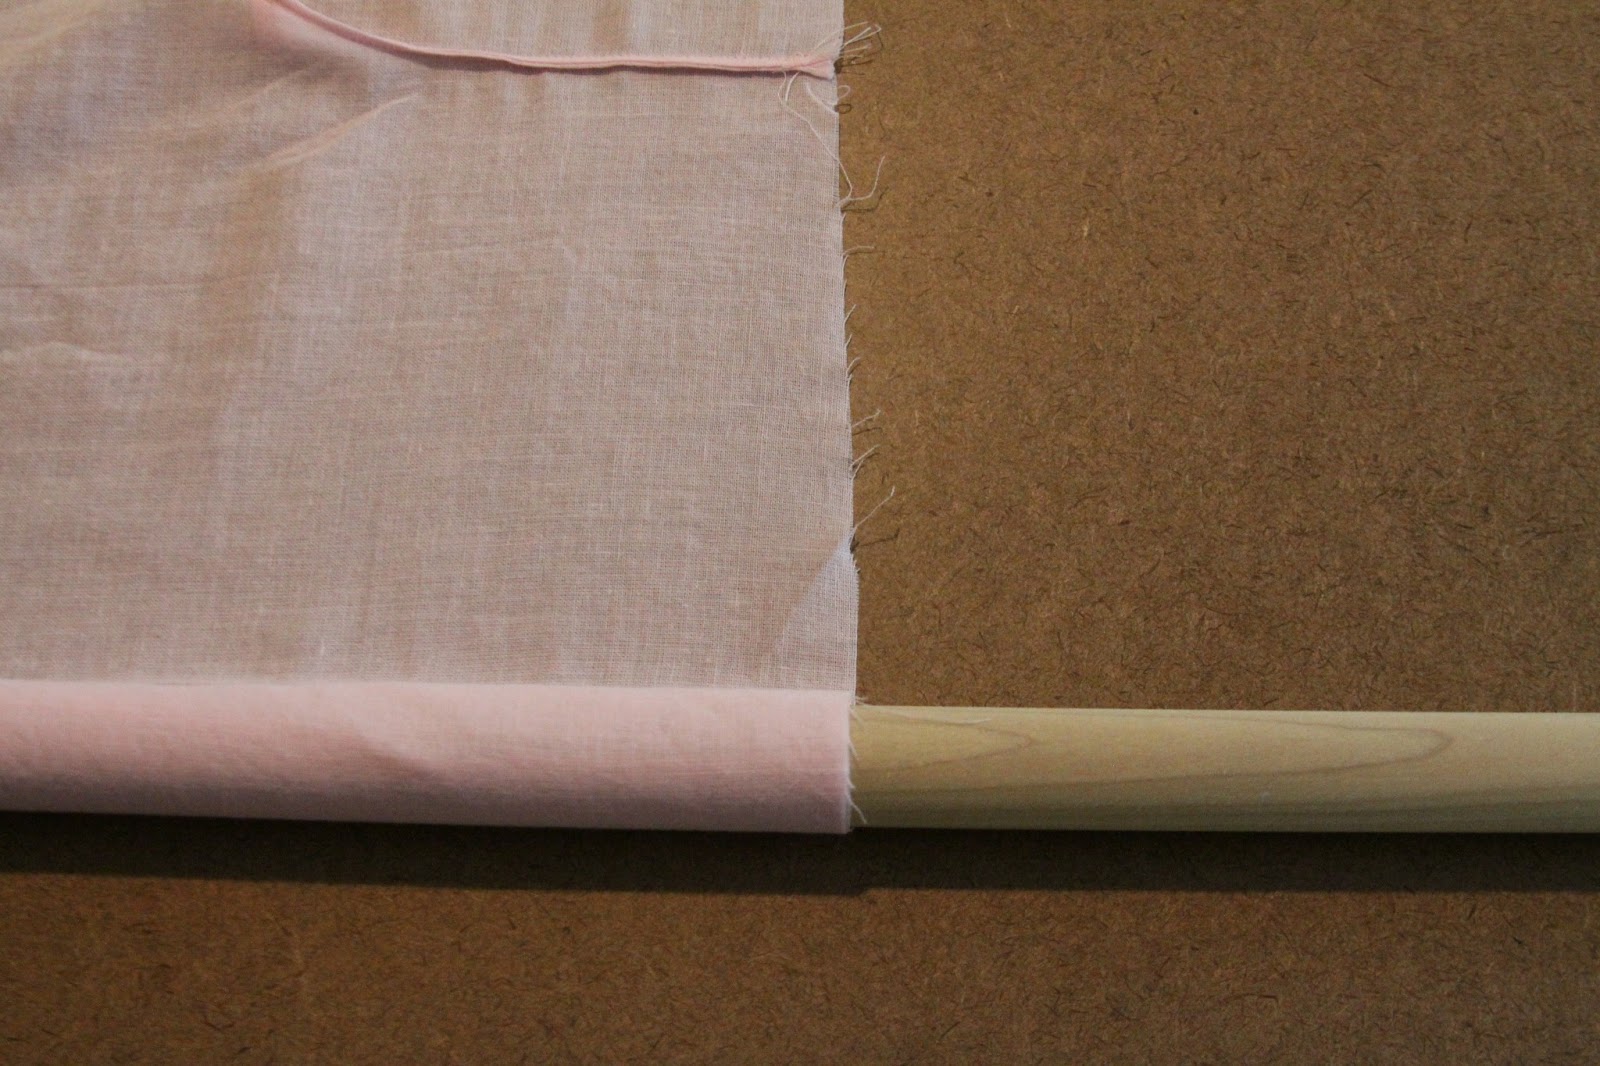

Feed the fabric through the pleater very slowly.


When you get to the end of the dress, remove the dowel and feed the rest through with your hands.

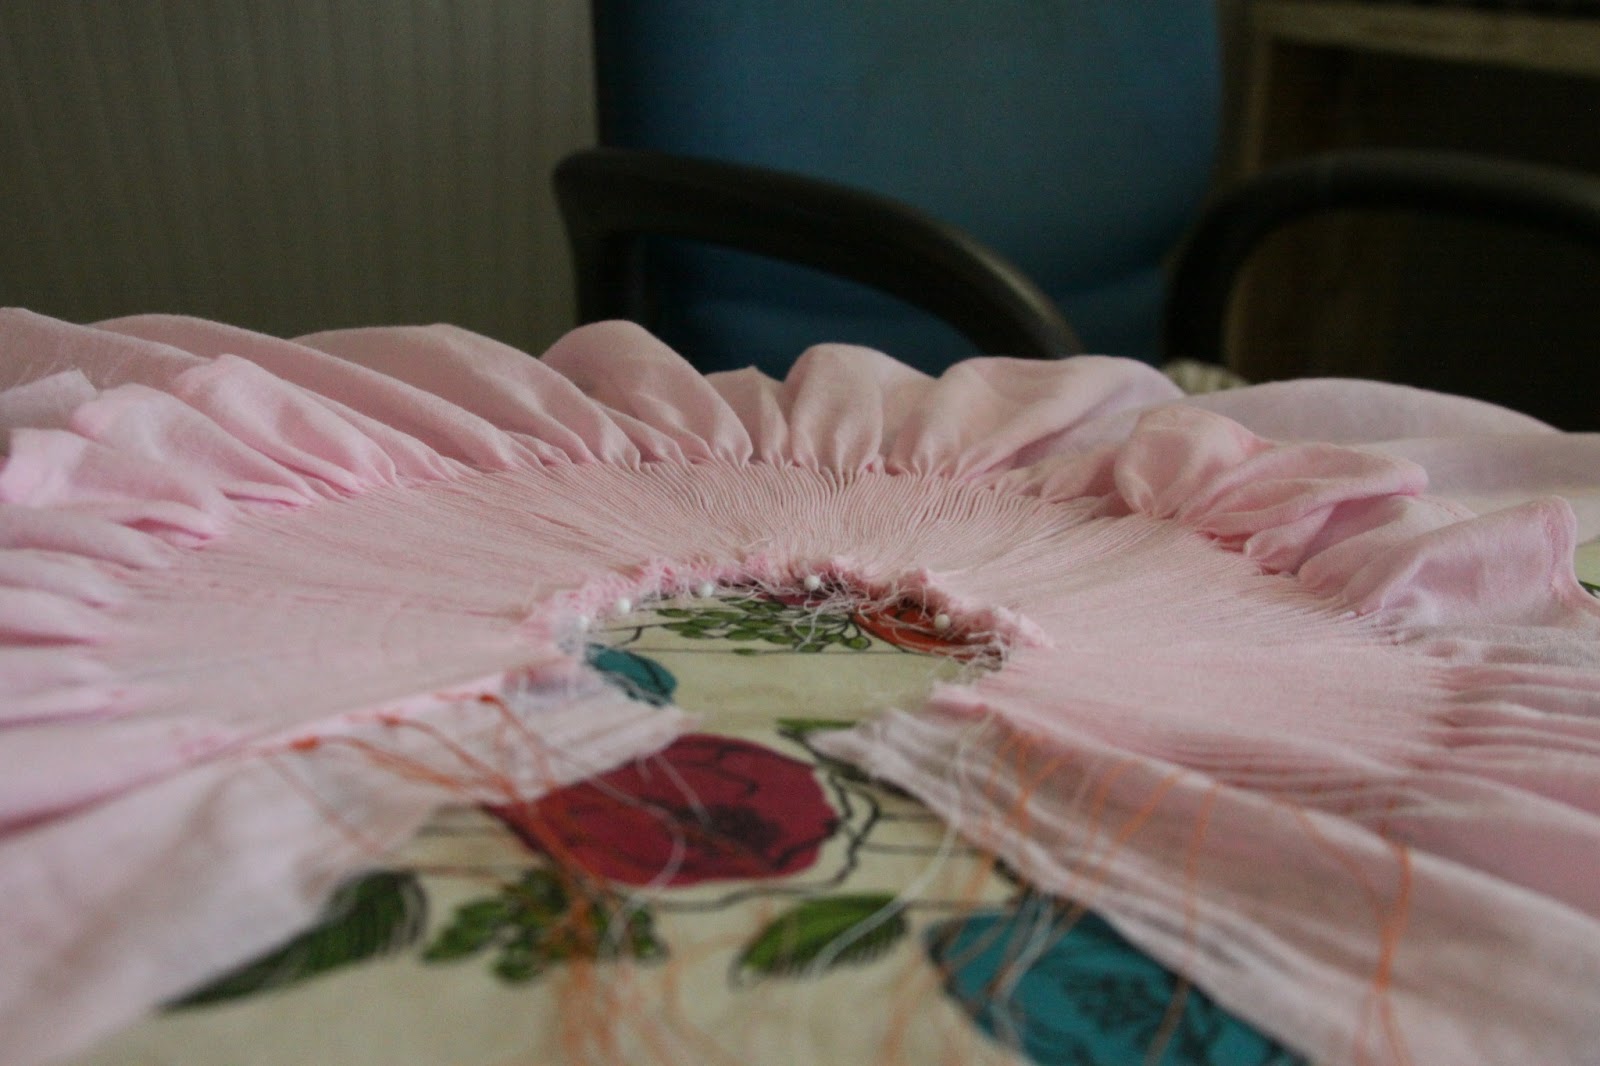
When the entire thing is pleated, pull it off of the pleater and make sure the threads are very long so you have room to work when you block the dress off.


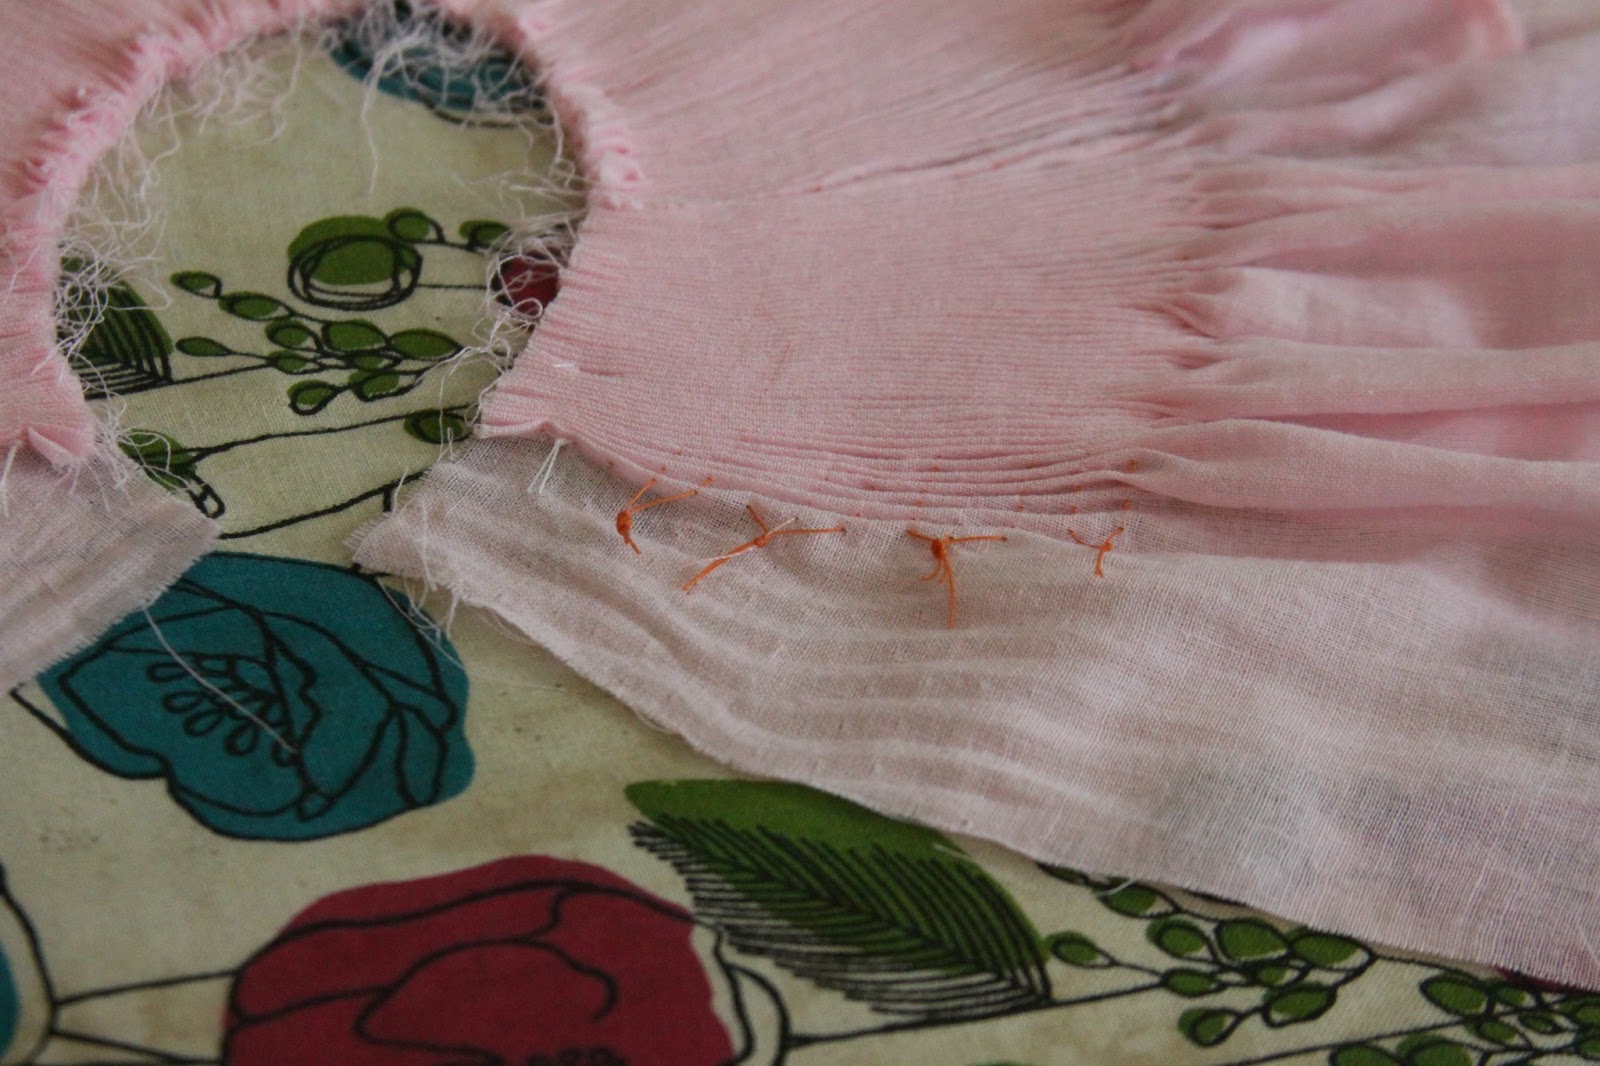
Pull the threads out of the back sections of the dress.
This fabric does not need to be pleated since this is where the buttons/button holes will be going.
This fabric does not need to be pleated since this is where the buttons/button holes will be going.


Using lots of pins, start to block the dress off. I really need a blocking board, but I don't have one... *cough* birthday gift *cough* :-)

Once you have the dress blocked and it is laying nicely, use lots of steam and don't move the dress until it has dried. Note, I'm not putting the iron on the dress as that would crush the pleats. I'm holding it just above the dress.

Once everything has dried, I pin the neck bias strip on the dress and sew it on. It is first stitched by the machine but is finished on the other side of the dress by hand so the stitches do not show through on the first side.
Some people would begin smocking and then put the bias strip
on but I like to have an almost finished dress before I start smocking.
on but I like to have an almost finished dress before I start smocking.

Notice the strip is about an 1/2 inch longer on each end -- this will allow for a nice finished edge when the strip is hand sewn to the other side of the dress.

Then sew the back together. I like to make a few stitches on top of the
seam as this keeps one side of the dress on top of the other side -- ie the buttons lay better.
seam as this keeps one side of the dress on top of the other side -- ie the buttons lay better.

And now for the smocking...

Once the smocking is done, just the button holes and hem are left to do. This was my first bishop dress doing bound button holes. They were a little tricky to do on this garment since they are so small! But I do like the look better than machine-button holes. I finished the other side of the bound button holes by hand since, again, the buttons are so small and right on the edge of the fabric.
Also, there is a row of back-smocking in the empty space between the neckline and first visible row of smocking. If you do not back-smock in empty space, then the pleats sorta come loose and look gross. I've learned this the hard way!


I hope this fits her friend's little girl well and they love it.
I think bishop dresses are so timeless and pretty.


I think bishop dresses are so timeless and pretty.
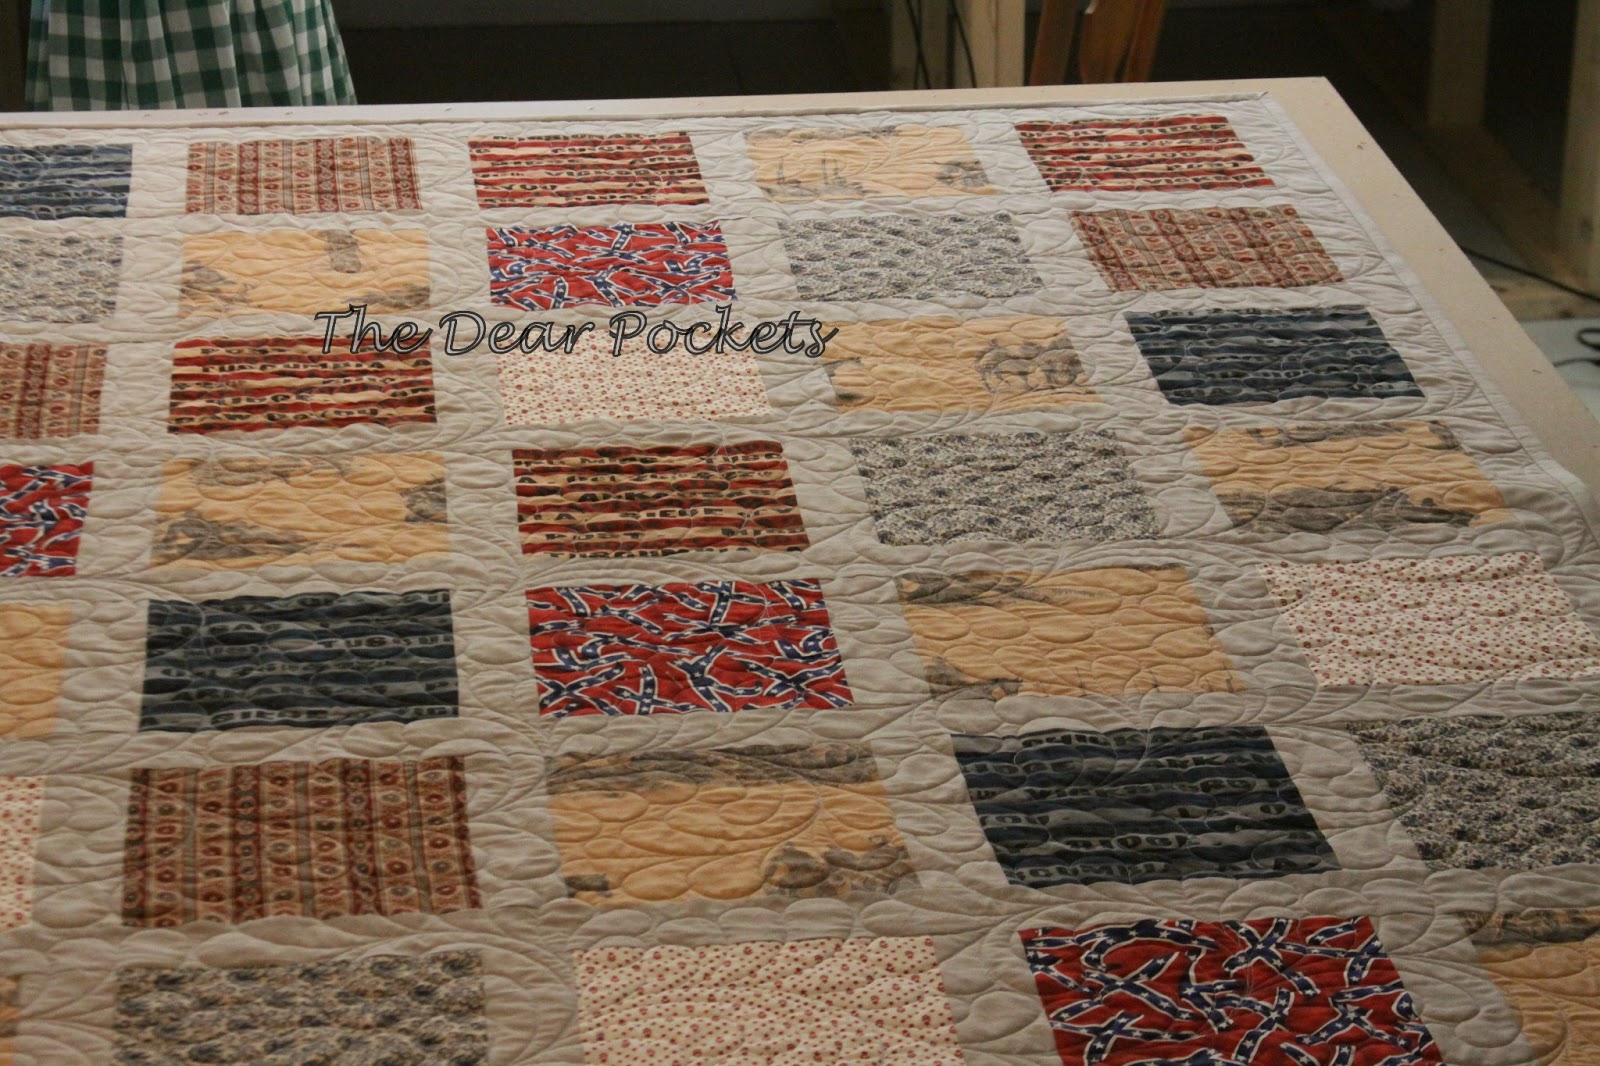
Civil War Quilt
My cousin hired me to make a Civil War Quilt for her. She loves the history and story of the Civil War.
We picked the fabric out together on various online fabric retailers.

Once the fabric was washed, then I started cutting out the pieces. The squares were 8.5" long and the grey strips were 2.5" by 8.5".


You're looking at 5 yards of 108" wide fabric that has been washed, dried, ironed and folded back into a neat pile. Talk about an arm workout!


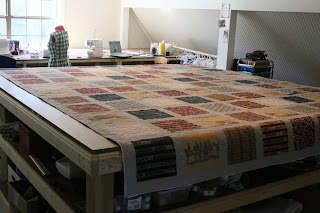
Once the piecing was complete, it was time to line up the backing with the front.


I love working with natural fibers - nothing makes you feel like a pro like ripping fabric down the grain line. :-)


Then I sent the quilt off to have it quilted by Rebecca Verrier-Watt of The Quilter's Station. This is the second quilt I've had done by Rebecca and I love her work! She is very friendly and knowledgeable.


The last step is to trim the edges and apply the binding.


To apply mitered corners to a binding...

Fold the binding over like so...

Then bring the binding back over to left. This will create a little triangular flap.

Move the flap over so it is facing down like so...

Continue sewing until you get to the edge of the flap being careful that you do not sew on the flap.

Then flip the flap and start sewing again. Repeat on all corners.

To finish the back of the binding, I use the machine but sew in the ditch so the stitches are not visible from the front of the quilt. In the picture below, you'll see the back of the quilt has been folded on top of the front of the quilt. From the back, you'll see the stitches but they are rather hard to see from the front. Sewing by machine is obviously faster but it also provides stronger stitches than hand-stitching. So in the long run, the quilt holds up better.


And the finished product...


The finished size was approximately 92" by 112".


Some Dr. Seuss Goodness
I made this for a friend who turned 30 years old. It's a great sentiment for us all to remember though.
I started with some linen and traced the design with a water soluble marker.


Once I was done, I put it in a frame.


Christmas Presents 2012
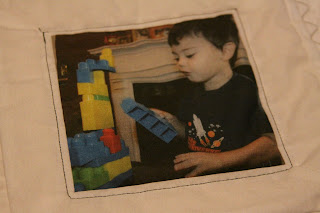
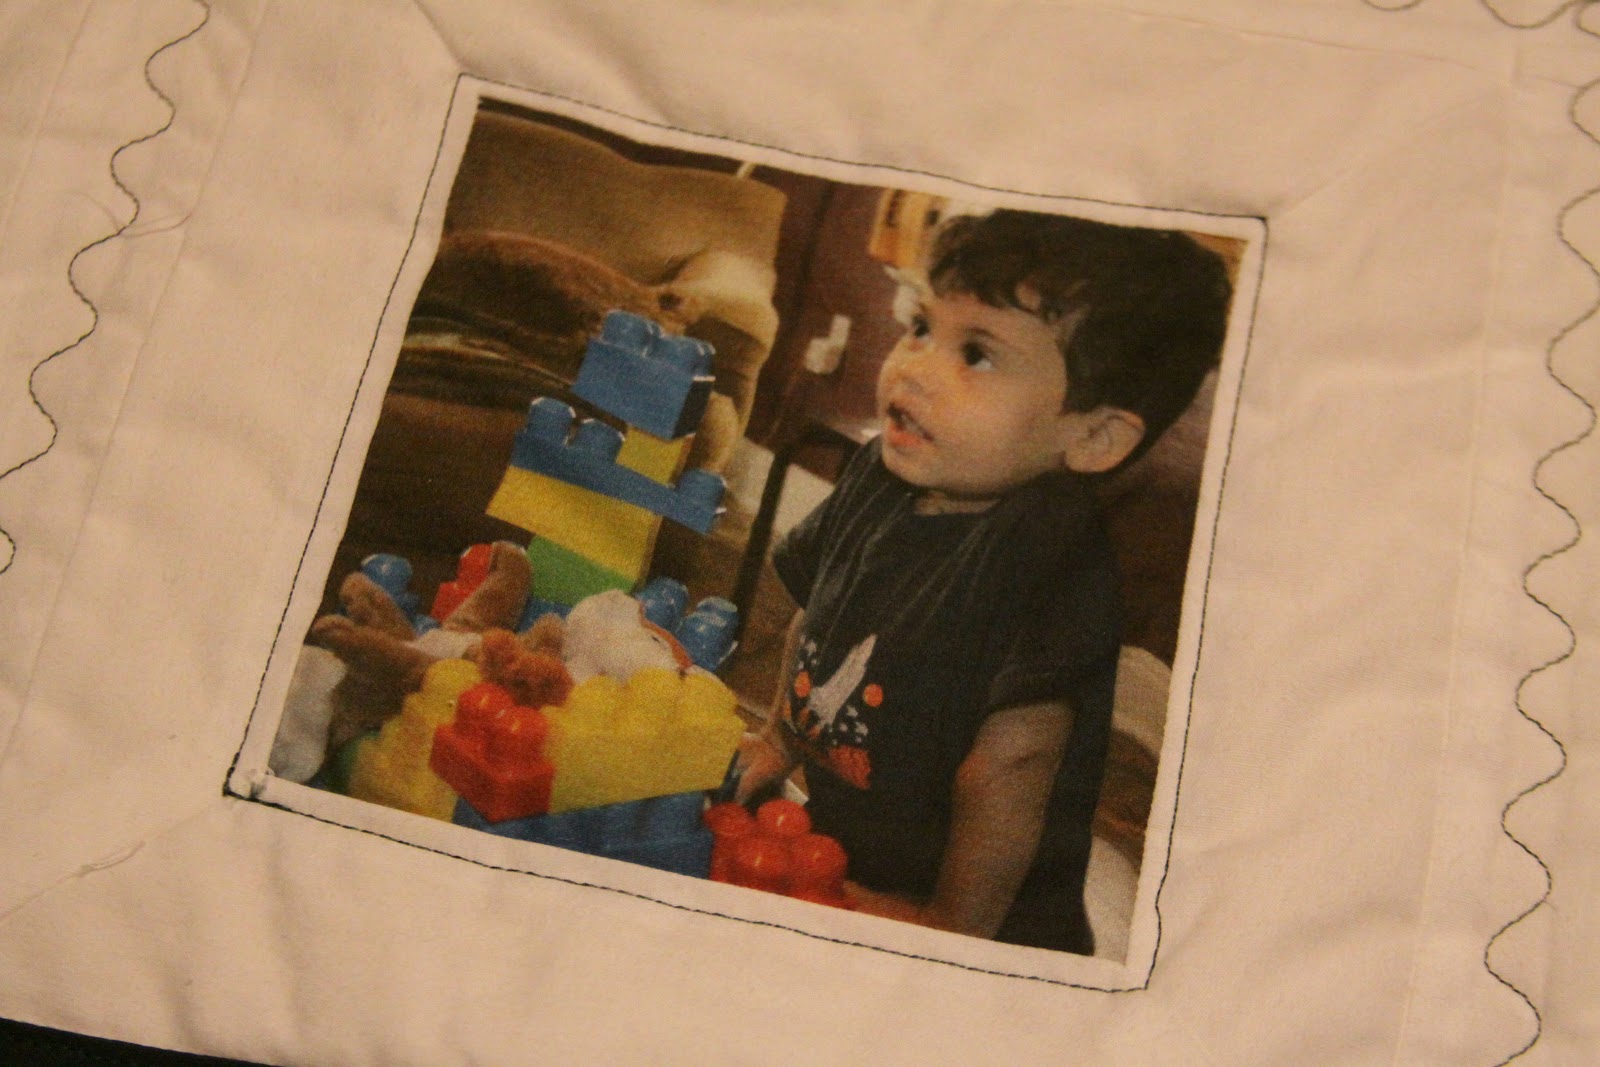
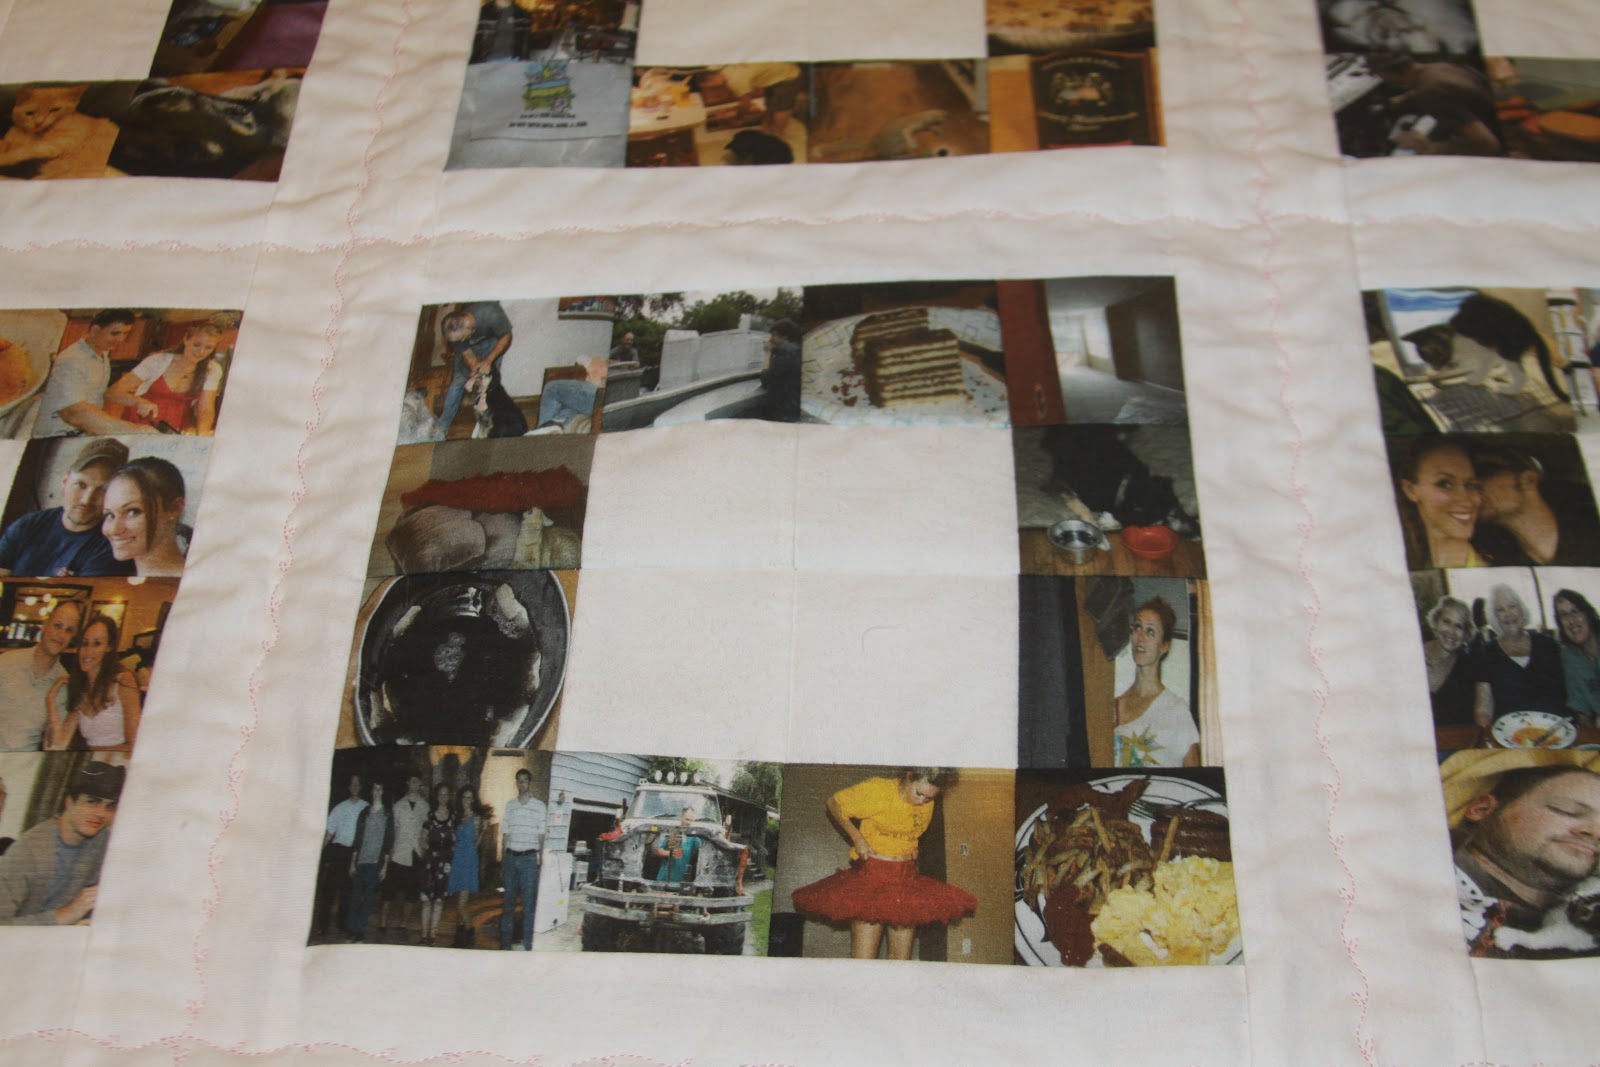
I made two memory quilts this holiday season. One of the quilts was for my mother-in-law while the other quilt was for my mother.
Here are the photos that show the progress for my mother-in-law's quilt. It was a memory quilt based around her grandson, Quillin.


Here are some pictures showing the process for my mom's quilt. My mom gave all of us kids a journal back in 2010 with the idea that we would fill it with details about our life (since we've all moved away now) and give it back to her. I've been a horrible person and haven't done any journal... so this quilt was my way of recapping 2010. Each block has 12 photos that capture each month.


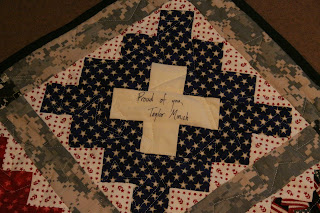
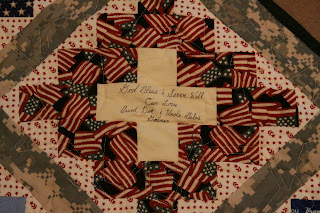
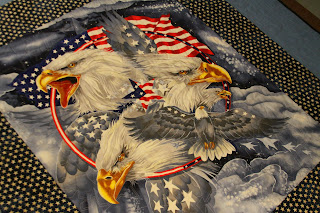
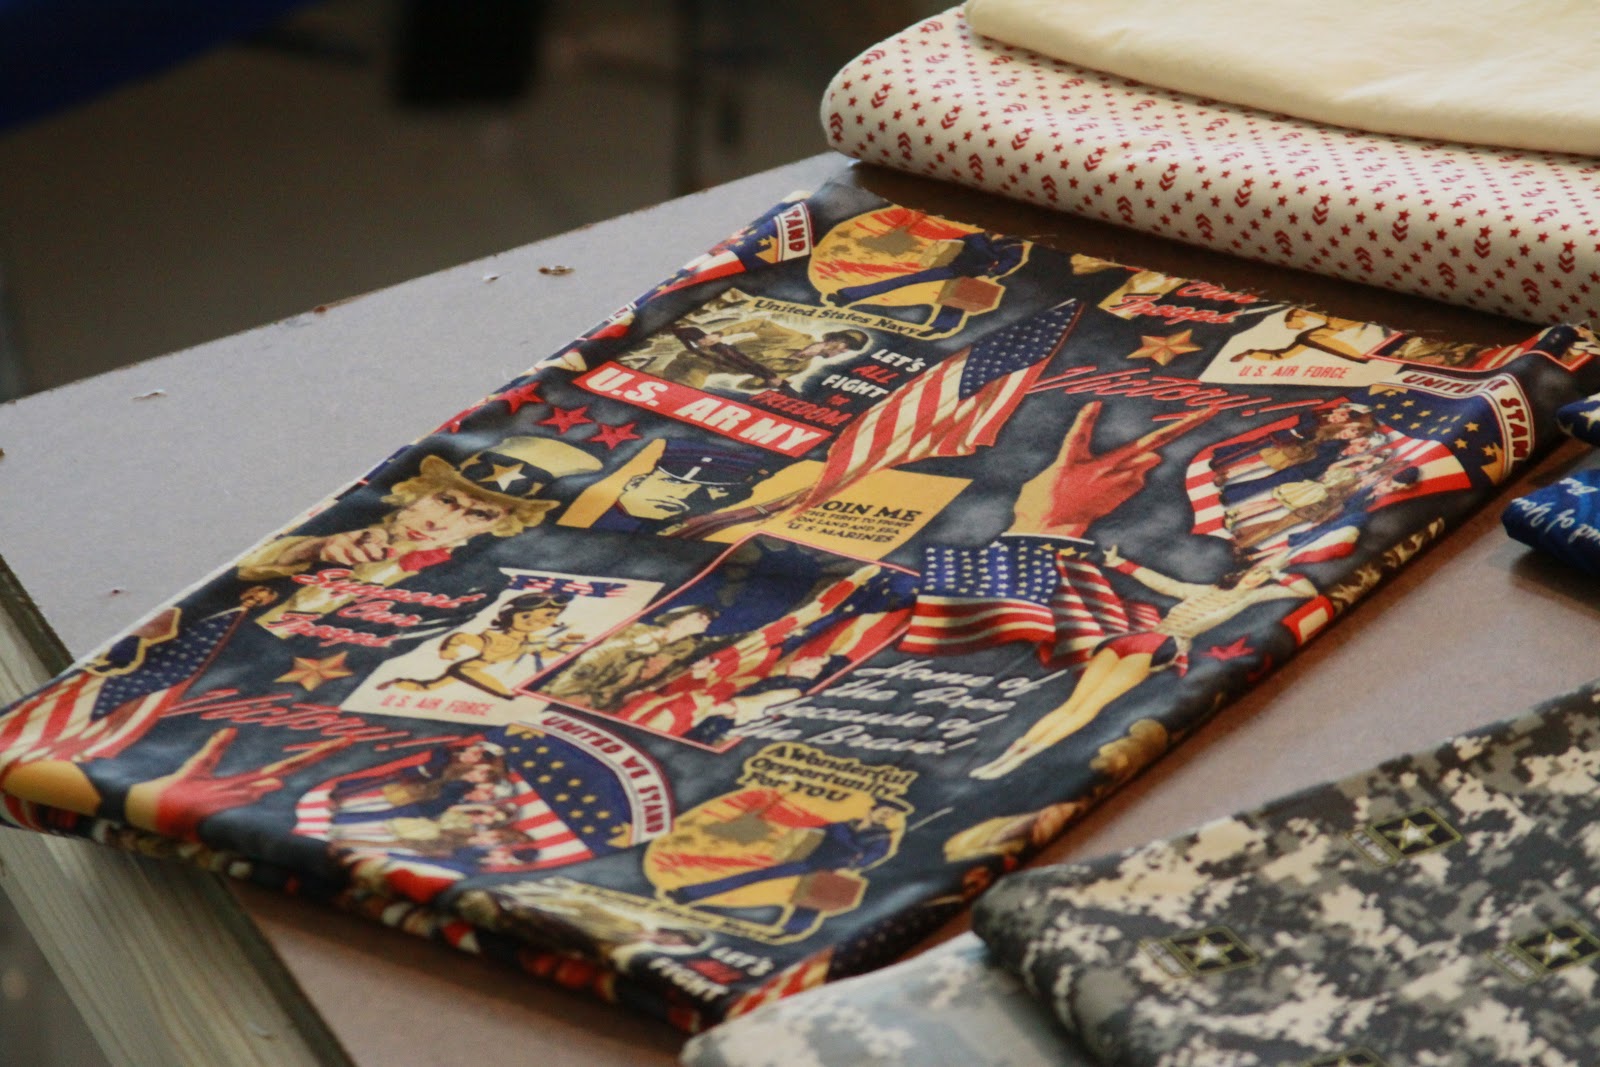
Army Quilt
I got the idea to make my brother, Kyle, an Army quilt since he joined the Army back in March. Now the world of dress making is quite different from the world of quilting. Also, I've only made one quilt of this size before... but technically it was a pieced-duvet cover (to avoid the quilting part).
It took me a long time to find suitable fabric for this project. While there is a lot of patriotic fabric (that tends to have a feminine touch), the selection of military fabric is limited.
Here is the fabric that I decided on once it arrived.


Then I had to cut a lot of pieces...
There were some 500- of the big triangles and about 168 of the small triangles.


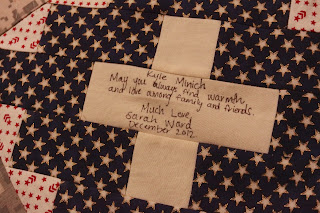
I wanted family and friends to sign a block of the quilt.

Then I had to piece them all together. There were 42 blocks in total.


Then I needed to make the back of the quilt.
And I mailed the quilt to Rebecca of The Quilter's Station to have the quilting done -- she was fabulous!! I highly recommend her. She did a wonderful job for a reasonable price in a wonderful turn-around time.
http://www.thequiltersstation.com/


Then I made a matching pillow case using Kyle's girlfriend's square. I figured she needed a special project for her block.


The finished quilt - and my brother is actually smiling in a photo!
